|
|
|
SNMP HOWTO |
|
|
|
|
|
|
|
Build 2.2.0.31
|

|
This is the official HOWTO on using JustSAMit to update Other Assets using SNMP |
|
|
Table of Contents
SNMP configuration for an Asset
Introduction
SNMP (Simple Network Management Protocol) is a computer network protocol that’s supported by many devices to allow you to monitor and/or control them.
justSAMit currently only supports the monitoring of existing assets via SNMP. Auto-discovery is not supported. The assets have to already be added to justSAMit either manually one by one or bulk imported using the CI import wizard.
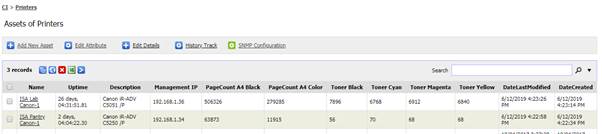
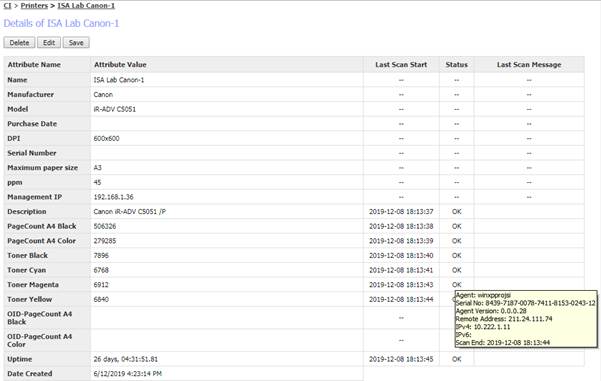
For example, you may have printers already added as Other Assets to justSAMit and you would now like to monitor their page counts and toner status/levels. First you will need to find out if the printers support SNMP and what the relevant SNMP OIDs (object identifiers) are for page counts and toner levels. To do so you may have to refer to the printer manufacturer and/or their website/documentation. SNMP OIDs are usually in a format similar to 1.3.6.1.x.x.x.x (where x are numbers).
Once you have confirmed SNMP support and what SNMP OIDs to use and enabled SNMP support on those printers (if not enabled by default), you can then login to justSAMit and add/set the required attribute (Management IP) and desired attributes (page counts, toner levels) for the printers using the SNMP Configuration section.
After that Scan Agents need to be installed on machines that can talk to those printers using SNMP.
SNMP Configuration
SNMP configuration for an Asset
Login and go to Other Assets and pick a Configuration Item
that you wish to perform SNMP Scanning on. Next click on ![]() .
Then you should see the following configuration panel.
.
Then you should see the following configuration panel.
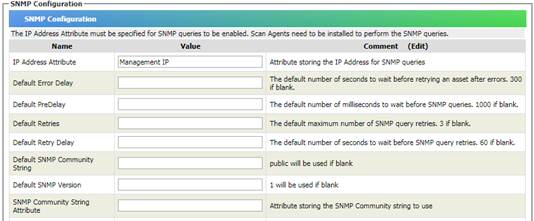
To enable SNMP querying of assets by the Scan Agents the IP Address Attribute MUST be configured and specified. For example if the attribute that contains the IP address for each Printer is called “Management IP” then enter Management IP as the value for IP Address Attribute.
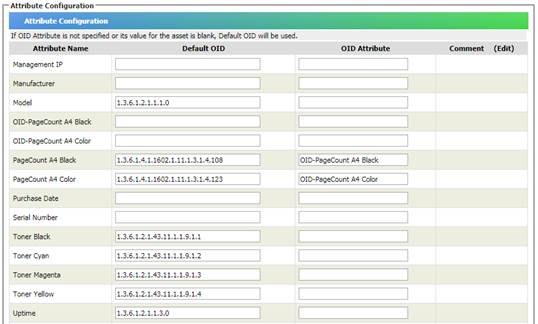
Next specify the Default OIDs for each Attribute to be updated via SNMP.
You can also specify an OID Attribute which stores the alternative OID to use if a different OID is to be used for that asset. This can be necessary if the asset is a different model or type.
Currently SNMP queries are only done once a day for each query-able attribute.
Installation
Scan Agents
The Scan Agents do the actual SNMP queries on the assets. You will need to install a Scan Agent on a PC that has SNMP network access to the assets to be scanned.
A Scan Agent can also be used to scan the machine it is installed on- this is called a Local Scan. The scan results are similar to those from a normal justSAMit Agent.
Download Scan Agents
To download the Scan Agent go to Administration, Scan Agents and Download Scan Agents

On this page you can build and download the Scan Agent installer.
Click on the Build/Rebuild button to build the installer.
Click on the file name to download the installer.
If a new version of the agent is available the build button may show a different version number from the version available to be downloaded. You can either download the existing version or click on the Build button to replace the existing version with a new build.
The SHA256 text is the hash that uniquely identifies the installer file. This hash can change after a rebuild even for the same version.
Manage Scan Agents
Scan Agent Settings
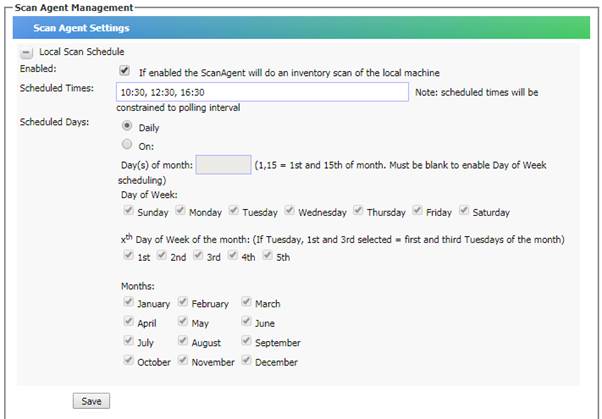
You can configure the Local Scan Schedule here. If enabled, a Local Scan is done when the Scan Agent contacts the server and the scheduled time has passed AND the scheduled time is later than the time the last scan was done. If no scheduled times are specified the Scan Agent will do a scan once a day. The polling interval is how often the Scan Agent contacts the justSAMit cloud server. The default polling interval is 240 minutes.
Click the Save button to save the settings.
Scan Agent List

This shows the known Scan Agents and some information.
Scan Agent Tasks
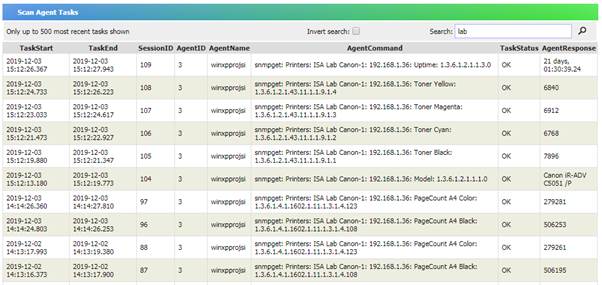
This is a list of recent Agent tasks. This can be used for troubleshooting Scan Agent and SNMP query issues.
Example Screenshots
Following are some screenshots